Create an Interactive Presentation with VTS Editor: Why and For Whom
Definition and Benefits
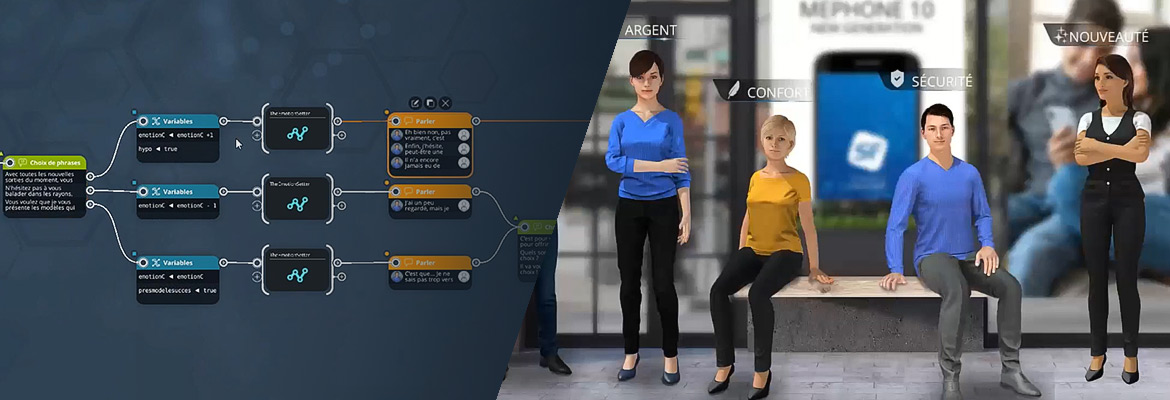
For a training manager, instructional designer, or HR director, the question is no longer “should we energize our materials?” but rather “how can we do it quickly, effectively, and measurably?”. An interactive VTS Editor presentation is a learning tool where the user interacts with the flow through choices, clicks, micro-activities, or assessments. Unlike a linear slideshow, you design conditional pathways, scenario-based learning, and real-time feedback. Pedagogically, learners become active participants, which enhances retention — active learning demonstrates significant performance gains (Freeman et al., 2014). From a managerial perspective, you gain usable data (score, progress, success/failure) within an LMS.
Three Key Differences from a Slideshow
First, the path is no longer fixed: with branching, a sales rep in onboarding can take a “quick” route while a technical profile explores a more detailed chapter. Next, attention is maintained through action (quizzes, drag-and-drop, clickable zones, sentence choices) rather than simply listening, reinforcing active learning (Chi & Wylie, 2014). Lastly, assessment becomes native via scoring, badges, and SCORM export, allowing you to track skill development and compliance.
To discover the software and its capabilities (avatars, sceneries, AI), check out the VTS Editor page and the dedicated interactive presentations page. Deployment and tracking are easily done with VTS Perform.
Why Choose VTS Editor for Your Interactive Presentation
VTS Editor is a no-code authoring tool that assembles visual blocks. You build scenarios by connecting “Information,” “Interaction,” and “Logic” bricks — no coding required. Instant previewing saves time on each iteration. Animated dialogue (Talk block), character emotions and animations, media types (Video, Slideshow, Audio), evaluations (Quiz, Drag & Drop, True/False, Matching), and logic (Score, Check Score, Flags, Counter, Switch, Sequence) cover all essential needs. Gamification is built in (multi-skill points, badges, feedbacks), SCORM export connects to your LMS, and VTS Perform provides real-time analytics and multi-device sync. For global deployment, translation management and text-to-speech lighten localization. These multimedia and interactive approaches are grounded in proven learning theories (Mayer, 2020) and serious games/simulations (Sitzmann, 2011).
Use Cases of an Interactive VTS Editor Presentation
From a training perspective, it’s used for onboarding, compliance/safety, change management, or relational simulations. From an HR perspective, it standardizes interview frameworks, supports reskilling through progressive assessments, and tracks adoption of internal policies. In sales/marketing, it delivers a product pitch with video, clickable areas, and micro-quizzes to gauge interest levels. The same foundation can evolve into a serious game, such as a safety investigation where the learner explores a set, questions characters, collects clues, makes decisions, and sees the impact on their score and badges. For inspiration, browse our client cases.
Preparing Your Interactive VTS Editor Presentation
Objectives and Key Metrics
Proper scoping determines success. Start with a clear objective (e.g., “present value proposition X in 3 minutes”). Select 2 to 4 business and learning indicators (completion rate, average score, average time, satisfaction). Then, choose the tracked skills on the Skills page (e.g., Communication, Product Knowledge, Compliance). Translate these intentions into a storyboard with “one idea per scene” to reduce cognitive load: a promise scene, a proof scene, a practice scene, then an assessment scene. Finally, clarify the call to action (what should the learner do next?).
Clear Scenario and Branching
Design a simple branching map. For instance, offer a Menu with a “quick path” and a “detailed path”. Use Sentence Choices to adjust the flow based on preferences (“Would you like client cases or the technical demo?”). Sprinkle Clickable Zones throughout the scenery to allow non-linear exploration (tech sheet, process video, testimonial). List the blocks you will use: Message and Slideshow to inform, Video and Foreground for impact, Quiz and Drag & Drop to assess, Score/Badge/Check Score to adapt the flow, Wait/Counter/Sequence/Switch to organize logic. Paths with frequent feedback enhance learning (Black & Wiliam, 1998).
Media and Accessibility
Prepare images at least in 1280×720, videos recommended in 1280×720, and a small audio bank (ambience + effects). Associate relevant emotions (joy, hesitation, anger) with your dialogue scenes and plan light animations to illustrate actions (waving, nodding, leaning). Choose a believable setting (office, workshop, store front). The Media in Scenery block allows you to play a video on a computer screen, show a map on a board, or alternate visuals by scene. Keep accessibility in mind: enable subtitles, use appropriate voice synthesis, and ensure text contrast. Set up your project (languages, interface, progress bar, timer if relevant, success/failure rules). If data needs to be pushed to a CRM or IS, plan a Web Request to send score and progress.
Build Your Interactive Presentation Step by Step with VTS Editor
Laying the Informational Framework
Start with a Text Animation for title and promise, then a short contextual Video (enable pause/replay for autonomy). Introduce each section with a concise Message, optionally with voiceover, and an image. A Slideshow works well for a “three key ideas” sequence, with voice-over if needed. When you need impact (key figure, safety alert, unique benefit), use Foreground to display a full-screen image, then return to narration. Add contextual layering: with Media in Scenery, bring the environment alive (a changing screen, a tutorial video playing during explanation).
Adding Interactivity Without Complexity
An initial Menu can offer “Discover the product,” “Client Cases,” “FAQs.” Sentence Choices simulate an exchange: the character turns toward the learner, shows the corresponding emotion, and you insert slight delays to mimic speech. Clickable Zones trigger micro-discoveries: upon hover, a clue; on click, a brief Message and soft sound (use Sound block with fade-in) make the experience more engaging. Combine Clickable Zone and Open Resource to automatically pull up a key asset from inventory, then close it to return to the storyline.
Assess Progressively and Adapt the Journey
Alternate single/multiple choice Quizzes with media, use True/False for quick validation, and use Drag & Drop or Matching to classify or associate concepts. Provide differentiated feedback based on accuracy, and use the “Show correction” option when the goal is learning. The Score and Check Score blocks allow flow modulation: below a threshold, direct to quick help; above, unlock a challenge. Place a Badge on a visible milestone (e.g., 100% zone explored, threshold score exceeded, challenge completed within time using Countdown). These rewards increase motivation and feed your analytics (sync available in VTS Perform).
Refining the Staging
In dialogue scenes, the Talk block brings characters to life: speaker selection, emotion, interlocutor (other character or learner), and micro-pauses for realism. Add Emotion blocks for non-verbal reactions, or Character Animation to accent a moment (e.g., waving, leaning). The Look block subtly directs attention (a ringing phone, a reacting colleague). The Sound block sets the ambient tone (quiet office, noisy shop), and directional effects guide the eye. Follow a coherent tone chart (palette, soft music, language level), and signal section shifts with brief Text Animations for orientation.
Controlling Logic and Rhythm
Wait creates breathing room and avoids the “machine-gun” effect. Sequence runs steps in strict order — useful for a protocol (“check—act—validate”). Countdown injects urgency (e.g., prioritize 3 actions in 30 seconds). Flags record actions (zone visited, choice made), and Check Flags gates the flow (e.g., unlock step 3 if A and B are done). The Counter limits attempts before triggering help. Switch streamlines branches based on a variable (step number, difficulty level). For 360° environments, Freeze 360 locks camera movement (to focus or limit), and Force 360 guides attention during narration. For managed non-linear navigation, Teleport creates persistent destinations, and Return/Checkpoint ensures smooth navigation back. Finally, Reset restores a block to initial state (like a Quiz) for clean reattempts.
Test, Publish, and Measure Your Interactive VTS Editor Presentation
Preview and Continuously Test
Instant preview lets you experience each scene as a learner. Open the Variable state view to check logic live: flags, counters, multi-skill scores, progress. Review all friction points: disconnected exits, oversized media, inconsistent sound levels. Draft short testing plans: one for the “quick” path, then “detailed”; one for failure-then-help after Quiz; one for “network unavailable” if using Web Request or AI Query. Two traps to avoid: overloading a single scene (prefer shorter sequences) and offering too many meaningless choices (make interaction purposeful). Well-balanced gamification strengthens engagement (Subhash & Cudney, 2018).
Optimize the Experience Before Publishing
Stick to videos in 1280×720 for stable rendering (avoid Full HD in Foreground), compress images without noticeable loss, balance audio levels, and add fades. Interface-wise, display only what’s necessary (progress bar if useful, timer only if pedagogically relevant). In 360° scenes, use Freeze 360 for instructions, then unlock the camera for free exploration, centering again as needed via Force 360. Reuse repetitive sequences through Function Call for cleaner graphs and easier maintenance. And don’t forget accessibility: subtitles, voiceover narration for key content, adequate contrast.
Publish in the Right Format
VTS Player provides the best multi-device experience, supports module resuming and multilingual interface. Web export enables quick sharing (beware, however, of certain alphabets in WebGL—then prefer VTS Player). SCORM export allows your LMS to capture progress, score, success/failure status; always test in a sandbox before a mass release. With VTS Perform, you get detailed analytics, badge synchronization, and cross-device module resumption.
Measure and Continuously Improve
Adjust Progress tracking at key milestones (33/66/100%) if you want more granularity than automatic settings. End with a recap screen showing score/badges to boost motivation. The Recap block (Windows/Mac) can generate a log of milestone decisions — useful for debriefing. For deeper analysis needs (CRM or BI connections), Web Request pushes data to your endpoints; you can also enrich a URL using Open Web Page with the score added. Lastly, perform small A/B tests: presentation order, question format, difficulty level; observe completion rates, average time and scores, and key area clicks, then iterate.
Take Action: Build Your Interactive VTS Editor Presentation in One Day
What matters most to training or HR teams is combining learning effectiveness with performance oversight. VTS Editor offers a no-code, fast-to-iterate structure, rich in interactions and natively measurable. By segmenting your message into scenes, alternating content and action, assessing progressively, and adapting flow via logic blocks, you create an engaging and useful experience. SCORM export or deployment via VTS Perform ensures full ecosystem integration. And replicability is real: once you’ve defined your functions and models, your speed improves project after project. To see the software in action, request a demo of VTS Editor.
Quick Checklist to Start Today
- Target a pilot module of 5–8 minutes, with a clear goal and 2 indicators.
- Write a 4-scene storyboard (promise, proof, practice, evaluation) with two simple branches (Menu).
- Gather your media, enable subtitles and text-to-speech.
- Build the framework (Message, Slideshow, Video), add 2–3 interactions (Sentence Choice, Clickable Zone, Quiz).
- Connect Score/Check Score, set a meaningful Badge.
- Test two user paths, publish in VTS Player or SCORM, analyze initial feedback.
Go Further Without Complicating Production
Variables allow adaptive paths (difficulty levels, personalization). Variable media reduce duplication: the same block changes image or video based on context. AI Query opens the door to dynamic dialogues or contextualized content generation. And when immersion is key, VR export immerses the learner in the target environment (tours, procedures, critical simulations). Your goal isn’t “to do tech” but to prove impact: engagement, retention, compliance. VTS Editor delivers the method, building blocks, and analytics to succeed — fast and at scale. To get started now, enjoy the 30-day free trial.
Simple Method Recap
From preparation to publishing, your interactive VTS Editor presentation follows a clear path: goals, concise storyboard, accessible media, meaningful interactivity, progressive evaluation, measurement, and refinements. Apply these steps and publish your interactive VTS Editor presentation via SCORM or VTS Perform for streamlined and measurable deployment.
Explore our exclusive resource on interactive presentations: learn how to define, design, and deploy your programs to maximize the impact of your training.
👉 Access the content


